Let us run with endurance the race God has set before us. We do this by keeping our eyes on Jesus, the champion who initiates and perfects our faith. Heb 12:1-2 (NLT)

Tuesday, June 29, 2010

Beef Tacos

Ease: 3.5/5     Kid-friendliness: 4/5     Taste: 5/5      Time: 2/5

Prep:
Cooking Time: min 4 hours


My dad had eight brothers and sisters. There are still seven of them; five in Alberta. My Grandma B is alive and kicking as well. When her children began moving out, she required only one thing of them: that they agree to come together at least four times a year to celebrate holidays and birthdays. Dutifully, they have done so. Family members take turns hosting. The host is responsible for the entree, and other family members bring the fixings.  This month was my husband and I's turn. Needless to say, it's a fairly large group that comes together. Cooking for large groups can stress me out a little. Turkey and roasts are the tried and true large group options, but this time around, I wanted to make something summery, and simple.

I landed on the idea of beef tacos. This worked out perfectly, because other than a little prep work, all that was required was throwing the beef into my slow cooker, giving me plenty of time to stress about cleaning the house.

What you'll need:
  • 1 1/2 lbs (680 g) extra lean ground beef
  • 3 Tbsp white vinegar
  • 1 Tbsp chili powder
  • 1 package Tex Mex seasoning
  • 1 tsp dried whole oregano
  • 1/4 tsp garlic powder
  • 1 1/2 tsp salt
  • 1/4 tsp pepper
  • 1 1/2 C chopped onion
  • 1 medium green bell pepper, chopped
  • 1 medium red bell pepper, chopped
  • 12 oz corn 
  • 2 tsp chili powder
  • 1 Tbsp Tex Mex seasoning
  • 1 tsp parsley flakes
  • 1/2 tsp dried whole oregano
  • couple dashes of tabasco sauce
  • 1/2 tsp salt
  • 1/2 tsp pepper
Mix first 8 ingredients in bowl. Scramble-fry in non-stick frying pan over medium-high heat until browned. Drain. 

Put onion into 3.5 or 5 quart slow cooker. Add peppers, corn and beef mixture. Stir. 

Combine remaining 7 ingredients in bowl. Stir well. Pour over top. Stir. Cover. Cook on low for 8 hours or on high for 4 hours. Makes 10 cups. 

To complete the tacos, I served the beef mix with hard and soft taco shells, chopped lettuce, chopped tomatoes, chopped red onion, chopped green onion, salsa, and tex mex cheese. 

It was a great afternoon!


Sunday, June 27, 2010

Mac n' Cheese

Ease: 3.5/5     Kid-friendliness: 5/5     Taste: 5/5     Time: 3/5


Prep: 20 minutes
Cook time: 40 minutes

My daughter's favorite foods in life include apple cinnamon cheerios, grilled cheese sandwiches, chicken nuggets, and Kraft Dinner. So on her actual day of birth, I set out to make some homemade mac n' cheese that would rival KD. A lofty quest, I know.

As many of you can attest, the best place to go to get the good, gooey, full-fat recipes is the The Pioneer Woman. She didn't let me down. She's got several mac n' cheese recipes on her site, and they all sounded perfect. I liked It's Not Your Granny's Mac N' Cheese, because it adds some vegetables to the pasta (I am cooking for kids here), and her Macaroni and Cheese recipe because I am partial to baked pasta dishes. So I combined the two. The result? Really really good. Your arteries may not thank-you, but your taste buds will. Cheesy, moist, buttery, sticky...

What you'll need:
  • 4 C macaroni
  • 1/4 red onion, diced
  • 1/2 red bell pepper, diced
  • 1 C frozen corn
  • 2-3 cloves garlic
  • olive oil
  • 1 whole egg, beaten
  • 1/4 C (1/2 stick) butter
  • 1/4 C all-purpose flour
  • 2 1/2 C whole milk
  • 2 heaping tsp dry mustard
  • 1 lb cheddar cheese, grated
  • 1/2 tsp salt
  • 1/2 tsp seasoning salt
  • 1/2 tsp ground black pepper
Preheat oven to 350 degrees F. 

In a large pot, boil pasta until very firm (I cooked mine for ~6 minutes). Drain and set aside. 


In a large skillet, add olive oil and saute onion, bell pepper, garlic and corn over medium heat for a couple of minutes. Set aside. 


In a small bowl, beat egg. 

In a large pot (really large), melt butter and sprinkle in flour. Whisk together over low heat. Cook for five minutes, whisking constantly. 

Pour in milk, add mustard, and whisk until smooth. Cook for five minutes until thick. Reduce heat. Take 1/4 C of the sauce and slowly pour it into the beaten egg, whisking constantly. Whisk together until smooth. 

Pour egg mixture into sauce, whisking constantly. Stir until smooth. 


Add cheese, and stir to melt. 

Add salt, pepper and seasoning salt. 

Pour in drained, cooked macaroni and stir to combine. 

Pour pasta into a buttered baking dish, and top with extra cheese. Bake for 20-25 minutes or until bubbly and golden on top. Serve and enjoy some serious comfort food!


Friday, June 25, 2010

Blueberry "Ice-cream"

Ease: 4/5     Kid-friendliness: 5/5     Taste: 3.5/5     Time: 4/5


I came across this recipe on the Today's Parent magazine website. This "ice-cream" is super fast to make. I found it a bit sweet, and more frozen yogurty than ice-creamy, but still really tasty. Great to enjoy on hot summer evenings.

What you'll need:

  • 2 1/2 C frozen blueberries (or fruit of your choice)
  • 1/2 C sugar
  • 2/3 C whipping cream (I used the 95% fat free kind)
In a food processor (or blender), combing the frozen fruit and the sugar. Process until the fruit is roughly chopped (I used a blender, and at first, the mixture was too dry to blend, so I let it sit and melt for a few minutes while I cleaned up from supper). The mixture will appear dry and crumbly. With the processor running, add the whipping cream though the chute in the lid until the mixture is thick, smooth and creamy (stop the machine once or twice to scrape down the sides). 

Serve immediately. It will be soft. You could also transfer the mixture to a container and place in the freezer to firm it up slightly. Leftovers could be kept in the freezer for a week.

Lastly, Hello fellow blog-hoppers! Thanks for stopping by. I'll be sure to swing 'round your place as soon as I can!

friday-follow

Smart and Trendy Moms
Friendly Friday Button


Thursday, June 24, 2010

Peanut Butter Pinwheels

Ease: 5/5     Kid-friendliness: 5/5     Taste: 5/5     Time: 5/5

Here is another quick and simple kid's snack idea (the possibilities with tortillas are endless!)

What you'll need:
  • whole wheat tortilla
  • 1 Tbsp smooth peanut butter (chunky makes the tortilla hard to roll)
  • 1 tsp honey
  • 1/4 C low fat granola
Spread one side of the tortilla with peanut butter and a bit of honey. Sprinkle with granola. Roll up and slice into bite-size pinwheels. It's that easy!


Tuesday, June 22, 2010

Baked Parmesan Chicken

Ease: 4/5     Taste: 5/5     Kid-friendliness: 3/5     Time: 3/5


Parmesan chicken is one of my husband's favourites. It's a good Father's Day dish. Of course, he likes his battered but that's adding a whole n'other step, not to mention a bunch of fat we don't need. Both my kids love pasta sauce too, so recipes that "mask" meat and veggies using pasta sauce, are always on my list.

This is a favourite recipe from my current favourite cook book: Williams-Sonoma The Weeknight Cook: Fresh & Simple Recipes for Good Food Everyday

Truth moment: I don't know what kale is so I used spinach (the black blobs in the picture) I had in my fridge that would otherwise have gone out with the trash this week.

If you're looking to reduce the fat, use less cheese as I find this recipe calls for a lot of cheese.

What you'll need:
  • 4 skinless, boneless chicken breasts
  • salt and pepper
  • 2 Tbsp olive oil
  • 1 bunch spinach (or kale), stems removed and leaves torn into large pieces 
  • 2 C purchased tomato-basil pasta sauce (my favorite is Prego)
  • 8 slices fresh mozzarella cheese
  • 1/2 C fresh parmesan cheese, grated (I used about half this amount)
Preheat the oven to 400 degrees F. Season the chicken with salt and pepper. Heat oil in a large ovenproof frying pan over medium-high heat. Add the chicken and brown both sides, turning once (~7 minutes). Remove to a plate.

Add the spinach to the pan and saute over medium-high heat until wilted,~ 1 minute. Return the chicken to the pan and pour the tomato sauce over the chicken and spinach. Place 2 mozzarella cheese slices (I only used one) on each chicken breast and sprinkle with the parmesan cheese. Bake until the cheese is golden and the chicken is cooked, about 20 minutes. Serve to your husband with a kiss!


Sunday, June 20, 2010

Toast Strips

Ease: 4/5     Kid-friendliness: 5/5     Taste: 5/5     Time: 4/5

Happy Father's Day! 

This recipe is perfect for getting the kids involved in preparing something for someone special. In our home, my husband is the pancake guru. In all honesty, he's way better at getting them just perfect than I am. So I didn't want to touch his well-earned title of Pancake-Extroidinaire. Toast strips are a fun alternative to pancakes and french toast. I found the recipe in Blender Baby Food: Over 125 Recipes for Healthy Homemade Meals.

What you'll need:

Toast
  • 1 egg
  • 2 Tbsp milk
  • 1/2 tsp vanilla
  • 1/2 tsp grated orange zest
  • 1/4 tsp ground cinnamon
  • 2 tsp butter/margarine
  • 1 slice bread cut into 1 inch strips
  • Strawberry yogurt dip (see below)
In blender, on high speed, puree egg, milk, vanilla, orange zest and cinnamon until smooth. Transfer to a shallow bowl or pie plate. 

In a skillet, melt butter over medium heat. Dip bread strips in egg mixture, turning until well coated. Arrange in a single layer in skillet. Cook, turning once, until both sides are golden (~3 min/side). Serve warm with fruity yogurt dip. 

I doubled the recipe, which soaked 3 slices of bread. 

Strawberry Yogurt Dip
  • 1/2 C plain yogurt 
  • 1 Tbsp honey
  • 1 banana
  • 1/2 C sliced strawberries (fresh or frozen - I used frozen)
  • 2 tsp lemon juice
In a blender on low speed, blend yogurt and honey until smooth. Add banana, strawberries, and lemon juice and puree until smooth. (In place of the banana and strawberries you could use almost any fruit combination. The recipe also suggested using 1 C chopped peeled pear and 1/4 tsp ground ginger, which I haven't tried yet, but sounds good).


Serve with fruit fresh (which also tastes great dipped in the strawberry yogurt dip), and you've got a nice breakfast. 

Thursday, June 17, 2010

Sugar Cookies

Ease: 4/5     Kid-friendliness: 5/5     Taste: 5/5     Time: 4/5

First, hello fellow Blog-hopp'in Friends! Thanks for stopping by...

I have been talking all week about the main event at my daughter's 3rd birthday part - cookie decorating. It worked out really well. The kid's loved it! (Warning: if you are concerned about getting your floors dirty, this idea is not for you).

I have tried a couple of different sugar cookie recipes, and they have always turned out...meh. My mother-in-law gave me this recipe years ago, and this was the first time I used it. I thought these sugar cookies turned out better than any previous ones I had made. They were fluffier (probably because of the cream of tartar!).

I was able to prepare the cookies ahead of time and I made the icing the morning of the party. Instead of goodie bags, I bought plain aprons from Michael's for the kids to take home and jazzed them up with soccer ball iron-ons for the boys (it is FIFA, after all), and cupcakes for the girls. I also had take-out boxes for the kids to take home uneaten creations. A bunch of decorating sprinkles, jube-jubes, and mini chocolates, and we were ready to go!

To help the mom's ensure our kids ran off the sugar, once the cookie decorating was complete, the kid's played outside. We had a soccer field set up, and a bubble blowing station. We were blessed with beautiful weather. All-in-all, I would absolutely do this kind of party again.


What you'll need:
  • 2 eggs
  • 2 C white sugar
  • 1 C shortening (melted)
  • 4 tsp cream of tartar
  • 2 tsp baking soda
  • 1 1/4 C milk
  • 1 tsp vanilla
  • 1 tsp nutmeg
  • 1 tsp salt
  • 4 1/2 to 5 1/2 C of flour
  • assorted cookie cutters
Preheat oven to 350 degrees F. 

Mix sugar, soda, cream of tartar, salt and nutmeg with 4 1/2 C flour. Stir in shortening, milk, and milk. Mix until thick and smooth (a nice dough-like consistency - you may need a little extra flour). 

Use the other 1/2 C flour to roll out the dough. Roll out to 1/2 inch thick. Use a cookie cutter and cut cookies out to desired shape. Place on cookie sheet and bake for ~ 10-12 minutes.


Other party menu items included sandwich trays pre-ordered from Safeway, a veggie platter, pretzels and:


Happy Friday!

friday-follow

Smart and Trendy Moms
Friendly Friday Button


A Brief Reflection on Creme de Tartre

As part of my daughter's cookie decorating birthday party, I obviously needed to make cookies. The sugar cookie recipe I have from my mother-in-law called for cream of tartar. I had no idea what cream of tartar was. 

At the grocery store, I set off to the dairy section and when I had no luck there I headed for the aisle that contained condensed milk. I mistakenly thought (as the name would imply), that cream of tartar was some sort of cream. I tracked down a store employee who looked like they might bake (i.e. a woman in the bakery section versus the 15 year old boy in the produce isle). She promptly took me to the spice aisle. It's a powder sold with the spices! 

After I got it home, I got curious about what exactly this stuff was. Here is what the jar says; "Cream of tartar is indispensable for a number of cooking and baking applications. Essential for use as a stabilizer for beaten egg whites, it is commonly required in angel food cakes and meringues. Cream of tartar helps prevent the crystallization of sugar in candy making and is often an ingredient in fondants and fudges". Ingredients: Potassium Bitartrate.

Despite a number of university chemistry courses under my belt, I felt no closer to understanding what this ingredient was. So I dug a little deeper. Turns out is is an acid. 


Cream of tartar is obtained when tartaric acid is half neutralized with potassium hydroxide, transforming it into a salt (sounds impressive, doesn't it). Grapes are the only significant natural source of tartaric acid, and cream of tartar is obtained from sediment produced in the process of making wine (how it ever crossed someone's mind to use wine sediment in baking, is beyond me)


Basically, it gives more volume to beaten egg whites and creates a creamier texture in candy and frosting by preventing the formation of sugar crystals . It is an essential ingredient in play doh and gingerbread house icing.


Tips and Tricks:
  • If you are beating eggs, and don't have any cream of tartar, you can use white vinegar (~1.8 tsp per egg white), but your baking may turn out coarser. 
  • It can be used with white vinegar to make a pasty cleaning agent, which can be used to clean brass and copper cookware, and used as a stain remover for sinks and bathtubs.
  • Cream of tartar and hydrogen peroxide can remove rust stains without scratching the surface (always test a small area first though). 
  • If mixed with sodium bicarbonate (baking soda), the two will neutralize each other, creating carbon dioxide and a sodium acetate solution, which mimics the action of baking powder. This is how most cooks made baking powder before it became commercially available (apparently, you need to be careful when doing this however).
After all this, I have yet to understand where the "cream" part of it's name comes from, except to link it to the fact that it makes frosting and icing creamier (if any of you know, please do tell!), but at least I learned something today.

Sources:
Safeway Cream of Tartar bottle

Wednesday, June 16, 2010

Sugar Cookie Icing

 Ease: 5/5     Kid-friendliness: 5/5     Taste: 5/5     Time: 5/5

A cookie decorating party would not be complete without colored icing. I found this over at allrecipes.com. I altered it only slightly. It worked really well. It's quick and easy to make. I liked it because it's not overly sweet. I made it the morning of the party and covered it with press and seal, and it was still soft when it came time to decorate (please note, that it does melt in warm weather. I packed some decorated cookies up for the park the next day, and what a sticky fantastic multi-colored mess that was!).


What you'll need:
  • 1 C confectioner's sugar
  • 4 tsp milk
  • 1 Tbsp light corn syrup
  • 1/2 tsp vanilla
  • 1/2 tsp almond extract
  • assorted food coloring
In a medium sized bowl, stir together the confectioner's sugar and milk until evenly mixed. 

Add the vanilla and almond extract and stir again until evenly  mixed.

Add the corn syrup and stir until evenly mixed. At this point it was a nice smooth consistency for spreading. I added a couple of drops of food coloring and mixed well. One bowl of this would have easily covered 20 cookies, but I wasn't sure so repeated the recipe 3 times with three different colors. This was way more icing than was needed! It dried to a tacky state within 20 minutes, and completely hard within an hour. I know I will be using this recipe again.

Canadian,Blog Hop,150x150

Tuesday, June 15, 2010

Cranberry Almond Punch

Ease: 5/5     Kid-friendliness: 2/5     Taste: 5/5     Time: 5/5

No party would be complete without a good punch. This is probably my favorite and most frequently used punch recipe, so I pulled it out for my daughter's birthday party. It's super easy to make. I marked it low for kid-friendliness because of the pop (we're holding off on pop for as long as possible), but adults and older kids will enjoy it!


What you'll need:
  • 2 L cranberry juice 
  • 1/2 L pineapple juice
  • 1/2 L ginger ale
  • 1 tsp almond extract
  • ice
  • lemons, sliced (optional)
Over ice, mix the above ingredients well. Garnish with lemon slices, and you have yourself a refreshing summer drink!


Monday, June 14, 2010

Cookies and Cheesecake, how could this be? My little girl just turned 3!

I did it. I made the mistake of blinking, and now I've got a three year old. And I've got a house full of balloons and sugar cookies to prove it. Not to mention, a little whip of a girl dishing out some serious sass.

I decided that this year, I would make my child's birthday cake instead of picking up the usual cupcake cake from Safeway. For me to make a cake for a bunch of people, you know it has got to be quick and simple. You may recognize these mini cheesecakes I posted about last week. I came across the recipe at Real Mom Kitchen and made the chocolate swirl variation. They turned out great!


I dressed them up with this cute idea from the Lovely Paper Blog. I scrapbook (or at least I did, before I took up parenting and blogging), so I have a ton of scrap paper lying around. This put all that scrap to perfect pretty use!


I just love simple prettifying ideas like these. You can reuse them too. 

Other menu items (which you'll soon be seeing) included sugar cookies, refried bean dip, and cranberry almond punch (the rest I picked up at my trusty local Safeway). 

Sunday, June 13, 2010

So guess what I've been called....

A Versatile Blogger!

Yenta Mary, otherwise known as the Food Floozie ( a food blog smartly written by a woman who has won or placed in over 60 cooking contents!) , has given me a special shout-out in naming me the recipient of The Versatile Blogger award.


Seeing as this is my first time being the recipient of anything since joining the blogosphere, I feel pretty happy this Sunday afternoon.

The guidelines for accepting this award require the recipient to (1) thank the person who gave it to you; (2) tell 7 things about yourself; and (3) pass the award on to 15 bloggers, whom you have recently discovered and think are fantastic.

Thank-you to Yenta Mary for stumbling across my blog and sending some love my way. I highly recommend anyone interested in food to check out her blog.

Now. 7 things about myself.

1. To this day, I still haven't been able to figure out how to whistle with a piece of grass. This really annoys me.

2. I am a classic Type-A personality and am okay with it. I figure I get a lot done because of it.

3. I think that most situations in life can be improved with a glass of wine.

4. I think the best way to learn about who you are and who you want to be, is to have a child.

5. I have no idea what arugula is. I think it is hard to get here in Canada, because I never see it at the grocery store. But I make a lot of recipes that call for it. I use spinach instead.

6. Until this weekend, I had no idea what Cream of Tartar was. I looked long and hard for it in the dairy section, and where they keep condensed milk, wrongly thinking it was some kind of cream (as the name implies). It's a powder sold in the spices aisle. I still don't really know what it is!

7. I don't think my husband likes a lot of the recipes I try. But he does a good job of making me think he does, which I love him for.

Now onto the important business of identifying 15 blogs I've recently come across and think are noteworthy. This was quite easy for me to do, since I'm so new to this I have been actively seeking out good blogs in order to find inspiration. So here is a list of 15 blogs that have inspired me in some way:

1. A Busy Nest
2. Cooking for Little Finger
3. Everybody likes Sandwiches
4. Fab Find Foodie
5. Food and Whine
6. Lovely Paper Blog
7. Nobody puts Mamma in a Corner
8. Real Mom Kitchen
9. Santa's Gift Shoppe
10. Shamrocks and Shenanigans
11. Stepping out of the Toybox
12. Sugar the Golden Retriever
13. The Domestic Project
14. Where's my Rolling Pin
15. Your Happiness make me Happy


    Friday, June 11, 2010

    Mocha Black Russian

    Feeling Chic?

    Don't take this quiz.

    I'm turning 31 in the not-so-distant future. Since recently informing my boss that I am not returning from maternity leave (because I no longer live in the same city),  I've been doing a lot of motivational reading on careers and making career changes. One of my favorite books on this subject is Lisa Johnson Mandell's Career Comeback: Repackage Yourself to Get the Job You Want. It's largely targeted at women in their forties, but the advice is applicable no matter what your age.

    One of Lisa's suggestions for landing that perfect job, is to raise your "chic" quota. To give you an idea of how much work this might take you, she conveniently provides a "How Hip Are You?" quiz. Thinking I would score somewhere in the middle and feel pretty good about how well I'm keeping up on the latest and greatest despite spending my days singing children's songs and watching The Backyardigans, I bombed!

    I had no idea what "Hulu", "Seven for All Mankind", or "Wiki" were. Or who Lloyd, Will.i.am or Judd Apatow were (is this because I'm Canadian?). If I wasn't feeling my age before, I'm feeling it now.

    To put some icing on this cake, she later tells you that nude panty hose are obsolete. When did this memo go around? In fact, I apparently looked like a "seventy-three-year-old retired school teacher on her way to Sunday school" at my husband's company Christmas party last year. Point taken. The hose are gone.

    To raise my spirits, I turned to the liquor cabinet. A couple of these tasty treats had me feeling a little more chic...

    What you'll need:
    • 1/2 C frozen mochaccino yogurt (chocolate would taste equally well)
    • 1 oz hazelnut kahlua
    • 1/2 oz amaretto
    • handful of ice
    Add all ingredients to a blender and mix until smooth and frothy. Poor into a martini glass or large cocktail glass.  Enjoy immediately! SO. GOOD.


    A friendly hello to fellow Friday-Follow Me participants!

    friday-follow


    Wednesday, June 9, 2010

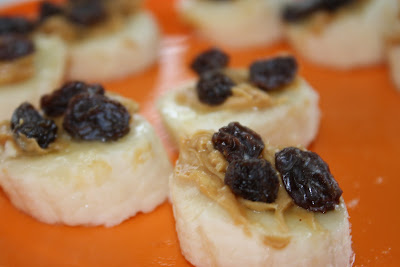
    Raisin Nut Bananas

    Ease: 5/5     Kid-friendliness: 5/5     Taste: 5/5     Time: 5/5


    These happen to be one of my favorite snacks too. I came across the idea in the May edition of Today's Parent magazine.  Kids will like helping to put the raisins on. So easy!

    What you'll need:
    • 1 whole banana, cut into 1/2 inch thick pieces
    • 1 Tbsp peanut butter (nutella would taste great too!)
    • raisins
    Spread a layer of peanut butter evenly over one end of the cut banana pieces. Top with raisins. That's it!

    Monday, June 7, 2010

    Pene with Pesto and Potatoes

    Ease: 3.5/5     Kid-friendliness: 4/5     Taste: 3/5     Ease: 3.5/5


    This is a quick, simple pasta dish. If you like pesto, you'll probably like this. I added a little less pesto than what the recipe called for, thinking my kids might not like such a strong pesto flavor. Turns out they love pesto!

    What you'll need:
    • 3 white boiling potatoes
    • salt
    • penne, ziti or other tubular pasta
    • 1 C green beans
    • 1 C basil pesto
    • 1/2 C grated parmesan cheese
    Put the potatoes in a medium sized pot, and cover with water. Bring to a boil over high heat. Reduce heat to medium, and cook until tender (~20 minutes). Drain and let cool. Peel the potatoes and cut them into small cubes.

    Meanwhile, bring a large pot of water to a boil. Add some salt, and pasta. Cook, stirring occasionally, until al dente. 5 minutes before the pasta is ready, add the beans (I added the beans 8 minutes before as they were frozen).

    Drain the pasta and beans, reserving 1/2 C of the cooking water. In a large serving bowl, mix a few tablespoons of the water with the pesto. Add the potatoes, pasta and beans and toss to combine. Add as much remaining cooking water to achieve a nice consistency for the sauce. Top with parmesan cheese, and serve! Makes 4 servings. 

    Saturday, June 5, 2010

    My Blog is Carbon Neutral

        carbon neutral coupons and shopping with kaufDA.de

    People are spending more time than ever on the computer. Myself included. Have you ever given any thought to the amount of emissions being released by computer use?

    I hadn't until I came across this initiative at Food Floozie's.

    According to Times Magazine Online, my google search to find out just what kind of emissions we're talking about, would have put forward between 1g to 10g of carbon. An amount comparable to that required to boil a kettle of water! Running a PC generates between 40g and 80g of carbon emissions per hour (according to the Apple website, my computer is putting out about 49g). And how often do you turn your computer on and leave it running for the majority of the day?

    As a family, we try to make environmentally conscious decisions. And yet, we have a large monitor computer, I do laundry and dishes every day, we drive two vehicles, etc. etc. The responsibility lies not only with manufacturers and companies taking steps towards being more environmentally friendly, but with individuals as well. So when something as easy to do as this comes along, why not embrace it?

    This is an easy enough initiative to participate in. "My blog is carbon neutral" was originally started in Germany by the "Make it green"programme. One tree is plated for this blog, thereby helping to neutralize my blog's carbon footprint. The trees are planted in Plumas National Forest in Northern California by "Arbor Day Foundation" (Recycle Bills has checked this claim and it pans out).

    And here is how you can participate:

    1. Write a blog post about the initiative + insert your favourite button
    2. E-mail the link to your post to CO2-neutral@kaufda.de
    3. They plant a tree for your blog in Plumas’!


    Friday, June 4, 2010

    Mini Cheesecakes

     Ease: 3.5/5     Kid-friendliness: 5/5     Taste: 5/5     Time: 4/5

    Look how precious THESE are:


    I came across this fun twist on cheesecake at Real Mom Kitchen. They are just the right serving amount. They would be perfect for a kid's birthday party. I made them for my mother-in-law's birthday, and they were a hit.

    What you'll need:
    • 2 packages (8 oz) cream cheese (I used light)
    • 3/4 C sugar
    • 2 eggs
    • 1 Tbsp lemon juice
    • vanilla wafers (I broke up graham crackers I had left over from making s'mores) and/or oreo cookies
    • 18-20 cupcake liners
    • pie filling, fresh fruit, or chocolate chips (I used whole blueberries,  whole raspberries, and chocolate chips)
    Preheat oven to 375 degrees F.

    Cream the cheese and sugar together. Add eggs and lemon juice. Beat until smooth.

    Line cupcake pan with liners. Scrape the filling off the oreos. Place oreos and/or wafers flat side down in each liner. 


    Fill liners 3/4 full with cream cheese mixture. Bake for 6 minutes. At this point I added the fruit or chocolate to the cheesecakes (4-5 blueberries or 2-3 raspberries or 4-5 chocolate chips. If adding chocolate chips, swirl them around in the batter with a toothpick). Continue baking for 9-14 minutes or until golden brown. 

    Allow cheese cakes to cool and store in the fridge. Before serving, I topped them with 3 blueberries, 1 raspberry or 4 chocolate chips, depending on what I had added to the batter (my daughter had fun topping them). You could also top these with pie filling before serving (can also be frozen prior to topping. To serve, thaw and top with fruit, chocolate chips or pie-filling).  Made 20. So good! Real Mom Kitchen also provides a Turtle Variation that sounds awesome.


    Lastly, a special hello to fellow Friday Followers!

    friday-follow

    Wednesday, June 2, 2010

    Chicken Ranch Wraps

    Ease: 5/5     Kid-friendliness: 5/5     Taste: 4/5     Ease: 5/5

    There is nothing to this recipe. You can barely even call this a recipe. I just appreciate being able to find snack and lunch ideas for my kids. It's easy to fall into a rut when it comes to snacks and lunches. My daughter would love to eat grilled cheese sandwiches and goldfish every day, but I figure a little variety is a good thing. This recipe is also an easy way to use up left-over roast chicken or turkey, or left over chicken breasts from supper the night before.

    These are a favorite of my daughter's.

    What you'll need:

    • 1 Tbsp olive oil
    • 1 bell pepper (I used 1/2 a green one, and 1/2 a yellow one), cut into think strips
    • 6 pieces of lettuce
    • 2 C cooked chicken, cut into strips (to save time, most grocery stores now sell packaged cooked strips of chicken and turkey breasts). 
    • 6 whole wheat tortillas
    • 2 Tbsp ranch dressing (I use light)
    • 1 C shredded cheese (I used marble)

    In a small skillet over medium-high heat, heat the oil. Add the pepper and sauté until tender (~ 3 minutes).

    Spread a thin (or amount that you desire) layer of ranch dressing evenly over one side of a tortilla. Sprinkle with shredded cheese. Layer a lettuce leaf, some pepper, and some chicken in the centre of the tortilla. Roll up tortilla length wise and enjoy (quick tip for toddlers: I often put the cheese on top and cut the wrap in half, and then heat it in the microwave for 20 seconds. This melts the cheese, and "seals" the wrap making it a little easier for my daughter to eat)! Makes about 6 wraps. 


    Creative Commons License
    This work by www.lucyssoupcan.com is licensed under a Creative Commons Attribution-Noncommercial-No Derivative Works 2.5 Canada License